Fedora 13 comes with 4 ntp packages: ntp, ntpdate, ntp-doc and ntp-perl. You don't need them all but it wouldn't hurt to install them. Also install these gps packages: gpsd and gpsd-clients.
If the ntpd server is running, stop it (service ntpd stop).
Get gpsd Working First.
- Attach the Holux M-241 tracker to your USB port. You should see
something like this using the "dmesg" command.
usb 3-2: new full speed USB device using ohci_hcd and address 2
usb 3-2: New USB device found, idVendor=10c4, idProduct=ea60
usb 3-2: New USB device strings: Mfr=1, Product=2, SerialNumber=3
usb 3-2: Product: CP2102 USB to UART Bridge Controller
usb 3-2: Manufacturer: Silicon Labs
usb 3-2: SerialNumber: 0001
usbcore: registered new interface driver usbserial
USB Serial support registered for generic
usbcore: registered new interface driver usbserial_generic
usbserial: USB Serial Driver core
USB Serial support registered for cp210x
cp210x 3-2:1.0: cp210x converter detected
usb 3-2: reset full speed USB device using ohci_hcd and address 2
usb 3-2: cp210x converter now attached to ttyUSB0
usbcore: registered new interface driver cp210x
cp210x: v0.09:Silicon Labs CP210x RS232 serial adaptor driver - The device, /dev/ttyUSB0, is now set up but you need to change
its operating speed to 38400 baud. You can do this using the command
"stty
-F /dev/ttyUSB0 ispeed 38400 ospeed 38400" and you can check it with
the command "stty -a -F /dev/ttyUSB0".
- You can now start the gps server with this command "gpsd -N -D 2
-F /var/run/gpsd.sock /dev/ttyUSB0" and you should get output similar
to this.
gpsd: launching (Version 2.39)
gpsd: listening on port gpsd
gpsd: Priority setting failed.
gpsd: running with effective group ID 0
gpsd: running with effective user ID 0
gpsd: opening GPS data source at '/dev/ttyUSB0'
gpsd: speed 38400, 8N1
gpsd: garmin_gps Linux USB module not active.
gpsd: gpsd_activate(1): opened GPS (6)
gpsd: ntpd_link_activate: 0
gpsd: => Probing device subtype 0
gpsd: can't use GGA time until after ZDA or RMC has supplied a year.
gpsd: => Probing device subtype 1
gpsd: => Probing device subtype 2
gpsd: => Probing device subtype 3
gpsd: => Probing device subtype 4
gpsd: => Probing device subtype 5
gpsd: => Probing device subtype 6
gpsd: => Probing device subtype 7
gpsd: MKT NACK: unknown sentence
gpsd: => Probing device subtype 8
gpsd: MKT NACK: unknown sentence
gpsd: MKT NACK: unknown sentence
gpsd: MKT NACK: unknown sentence
gpsd: MKT NACK: unknown sentence
gpsd: MKT NACK: unknown sentence
gpsd: ntpd_link_activate: 1
gpsd: MKT ACK: 320
gpsd: MKT ACK: 300
gpsd: MKT ACK: 314
gpsd: MKT ACK: 301
gpsd: MKT ACK: 313 - Notice that I started the server in the foreground and not as a background daemon.
- Now we can verify that your receiver is working and receiving
satellite data by executing the "xgps" client from another open
terminal window. You should get something close to this image.
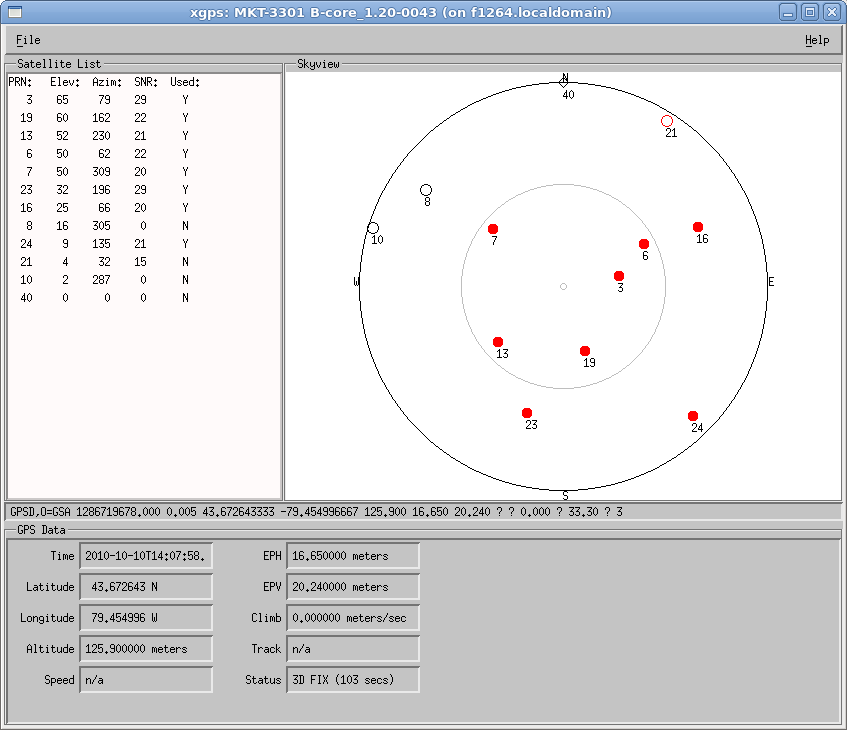
- Ok, so now you know your gps server is working.
Configure Your NTP Server
- First ensure that your firewall allows network packets over
port 123. If you don't know how to use iptables, just enter "service
iptables stop" to drop the entire firewall.
- I made some changes to the /etc/ntp.conf file. Here's the
result.
# For more information about this file, see the man pages
# ntp.conf(5), ntp_acc(5), ntp_auth(5), ntp_clock(5), ntp_misc(5), ntp_mon(5).

driftfile /var/lib/ntp/drift

# Permit time synchronization with our time source, but do not
# permit the source to query or modify the service on this system.
restrict default kod nomodify notrap nopeer noquery
restrict -6 default kod nomodify notrap nopeer noquery

# Permit all access over the loopback interface.  This could
# be tightened as well, but to do so would effect some of
# the administrative functions.
restrict 127.0.0.1
restrict -6 ::1

# Hosts on local network are less restricted.
#restrict 192.168.1.0 mask 255.255.255.0 nomodify notrap

# Added following 1 line by Selmys on Oct 9, 2010 ###########################
restrict 192.168.2.0 mask 255.255.255.0 nomodify

# Use public servers from the pool.ntp.org project.
# Please consider joining the pool (http://www.pool.ntp.org/join.html).
# Commented out the following 3 lines by Selmys on Oct 9, 2010 ##############
#server 0.fedora.pool.ntp.org
#server 1.fedora.pool.ntp.org
#server 2.fedora.pool.ntp.org

# Added following 2 lines by Selmys on Oct 9, 2010 ##########################
server 127.127.28.0 minpoll 4
fudge  127.127.28.0 time1 0.183 refid NMEA

#broadcast 192.168.1.255 autokey	# broadcast server
#broadcastclient			# broadcast client
#broadcast 224.0.1.1 autokey		# multicast server
#multicastclient 224.0.1.1		# multicast client
#manycastserver 239.255.254.254		# manycast server
#manycastclient 239.255.254.254 autokey # manycast client

# Undisciplined Local Clock. This is a fake driver intended for backup
# and when no outside source of synchronized time is available.
#server	127.127.1.0	# local clock
#fudge	127.127.1.0 stratum 10

# Enable public key cryptography.
#crypto

includefile /etc/ntp/crypto/pw

# Key file containing the keys and key identifiers used when operating
# with symmetric key cryptography.
keys /etc/ntp/keys

# Specify the key identifiers which are trusted.
#trustedkey 4 8 42

# Specify the key identifier to use with the ntpdc utility.
#requestkey 8

# Specify the key identifier to use with the ntpq utility.
#controlkey 8

# Enable writing of statistics records.
#statistics clockstats cryptostats loopstats peerstats

# Added following 2 lines by Selmys on Oct 9, 2010 ##########################
logfile /var/log/ntp
logconfig =all - I now started the ntp server with the command "service ntpd
start". Here's the contents of the /var/log/ntp log file.
10 Oct 10:20:55 ntpd[9247]: SHM(0) 8011 81 mobilize assoc 54383
10 Oct 10:20:55 ntpd[9247]: 0.0.0.0 c016 06 restart
10 Oct 10:20:55 ntpd[9247]: 0.0.0.0 c012 02 freq_set kernel 308.166 PPM
10 Oct 10:20:56 ntpd[9247]: SHM(0) 8024 84 reachable
10 Oct 10:20:56 ntpd[9247]: SHM(0) 963a 8a sys_peer
10 Oct 10:20:56 ntpd[9247]: 0.0.0.0 c41c 0c clock_step -0.252198 s
10 Oct 10:20:56 ntpd[9247]: 0.0.0.0 c414 04 freq_mode - Now use the "ntpstat" command to verify that your ntp server is
getting the time from your gps server. Here's what you should see.
synchronised to UHF radio at stratum 1
   time correct to within 19 ms
polling server every 16 s - Notice that your clock is now synchronized with the gps system to within 19 milliseconds and that your PC is now a stratum-1 time server. Stratun-0 is the satellite clock and stratum-2 would be a PC running ntpd and using your PC as a clock source.
- Another check would be to use the "nptq -p" command which would
give output similar to this:
 remote           refid          st t when poll reach   delay   offset  jitter
==============================================================================
*SHM(0) .NMEA. 0 l 13 16 377 0.000 -18.190 24.973 - Great! You're all done.